About discovery methods for System Center Configuration Manager
Applies to: System Center Configuration Manager (Current Branch)
Each System Center Configuration Manager discovery method can find different devices on your network or devices and users from your Active Directory. To efficiently use a discovery method you should understand its available configurations and limitations.
Active Directory Forest Discovery
Configurable: Yes
Enabled by default: No
Accounts you can use to run this method:
- Active Directory Forest Discovery Account (user defined)
- Computer account of the site server
Unlike other Active Directory discovery methods, Active Directory Forest Discovery does not discover resources that you can manage. Instead, this method discovers network locations that are configured in Active Directory and can convert those locations into boundaries for use throughout your hierarchy.
When this method runs it searches the local Active Directory forest, each trusted forest, and each additional forest that you configure in the Active Directory Forests node of the Configuration Manager console.
Use Active Directory Forest Discovery to:
- Discover Active Directory sites and subnets, and then create Configuration Manager boundaries based on those network locations
- Identify supernets that are assigned to an Active Directory site and convert the supernet into an IP address range boundary
- Publish to the Active Directory Domain Services of a forest when publishing to that forest is enabled, and the specified Active Directory Forest Account has permissions to that forest
You can manage Active Directory Forest Discovery in the Configuration Manager console from the following nodes under Hierarchy Configuration in the Administration workspace:
- Discovery Methods: Here you can enable Active Directory Forest Discovery to run at the top-level site of your hierarchy. You can also specify a simple schedule to run discovery, and configure it to automatically create boundaries from the IP subnets and Active Directory sites that it discovers. Active Directory Forest Discovery cannot be run at a child primary site or at a secondary site.
- Active Directory Forests: Here you configure the additional Active Directory forests that you want to discover, specify the account to use as the Active Directory Forest Account for each forest, and configure publishing to each forest. Additionally, you can monitor the discovery process and add IP subnets and Active Directory sites to Configuration Manager as boundaries and members of boundary groups.
To configure publishing for Active Directory forests for each site in your hierarchy, connect your Configuration Manager console to the top-level site of your hierarchy. The Publishing tab in an Active Directory site Properties dialog box can only display the current site, and its child sites. When publishing is enabled for a forest and that forests schema is extended for Configuration Manager, the following information is published for each site that is enabled to publish to that Active Directory forest:
- SMS-Site-
- SMS-MP-
- - SMS-SLP-
- - SMS-
-
Note
Secondary sites always use the secondary site server computer account to publish to Active Directory. If you want secondary sites to publish to Active Directory, ensure the secondary site server computer account has permissions to publish to Active Directory. A secondary site cannot publish data to an untrusted forest.
Caution
When you clear the option to publish a site to an Active Directory forest, all previously published information for that site, including available site system roles, is removed from the Active Directory of that forest.
Actions for Active Directory Forest Discovery are recorded in the following logs:
- All actions, with the exception actions related to publishing, are recorded in the ADForestDisc.Log file in the
\Logs folder on the site server. - Active Directory Forest Discovery publishing actions are recorded in the hman.log and sitecomp.log in the
\Logs folder on the site server.
For more information about how to configure this discovery method, see .
Active Directory Group Discovery
Configurable: Yes
Enabled by default: No
Accounts you can use to run this method:
- Active Directory Group Discovery Account (user defined)
- Computer account of the site server
Tip
In addition to the information in this section, see .
Use this method to search Active Directory Domain Services (AD DS) to identify:
- Local, global, and universal security groups
- The membership of Groups
- Limited information about a groups member computers and users, even when those computers and users have not previously been discovered by another discovery method
This discovery method is intended to identify groups and the group relationships of members of groups. By default, only security groups are discovered. If you want to also find the membership of distribution groups you must select the checkbox for the option Discover the membership of distribution groups on the Option tab in the Active Directory Group Discovery Properties dialog box.
Active Directory Group Discovery does not support the extended Active Directory attributes that can be identified by using Active Directory System Discovery or Active Directory User Discovery. Because this discovery method is not optimized to discover computer and user resources, consider running this discovery method after you have run Active Directory System Discovery and Active Directory User Discovery. This is because this method creates a full DDR for groups, but only a limited DDR for computers and users that are members of groups.
You can configure the following discovery scopes that control how this method searches for information:
- Location: Use a location if you want to search one or more Active Directory containers. This scope option supports a recursive search of the specified Active Directory containers that also searches each child container under the container you specify. This process continues until no more child containers are found.
- Groups: Use groups if you want to search one or more specific Active Directory groups. You can configure the Active Directory Domain to use the default domain and forest, or limit the search to an individual domain controller. Additionally, you can specify one or more groups to search. If you do not specify at least one group, all groups found in the specified Active Directory Domain location are searched.
Caution
When you configure a discovery scope, select only the groups that you must discover. This is because Active Directory Group Discovery attempts to discover each member of each group in the discovery scope. Discovery of large groups can require extensive use of bandwidth and Active Directory resources.
Note
Before you can create collections that are based on extended Active Directory attributes (and to ensure accurate discovery results for computers and users), run Active Directory System Discovery or Active Directory User Discovery, depending on what you want to discover.
Actions for Active Directory Group Discovery are recorded in the file adsgdis.log in the \LOGS folder on the site server.
For more information about how to configure this discovery method, see .
Active Directory System Discovery
Configurable: Yes
Enabled by default: No
Accounts you can use to run this method:
- Active Directory System Discovery Account (user defined)
- Computer account of the site server
Tip
In addition to the information in this section, see .
Use this discovery method to search the specified Active Directory Domain Services (AD DS) locations for computer resources that can be used to create collections and queries. You can also install the Configuration Manager client on a discovered device by using client push installation.
By default, this method discovers basic information about the computer including the following:
- Computer name
- Operating system and version
- Active Directory container name
- IP address
- Active Directory site
- Last Logon Timestamp
To successfully create a discovery data record (DDR) for a computer, Active Directory System Discovery must be able to identify the computer account and then successfully resolve the computer name to an IP address.
You can view the full list of default object attributes returned by Active Directory System Discovery, and configure the method to discover additional (extended) attributes in the Active Directory System Discovery Properties dialog box on the Active Directory Attributes tab.
Actions for Active Directory System Discovery are recorded in the file adsysdis.log in the \LOGS folder on the site server.
For more information about how to configure this discovery method, see .
Active Directory User Discovery
Configurable: Yes
Enabled by default: No
Accounts you can use to run this method:
- Active Directory User Discovery Account (user defined)
- Computer account of the site server
Tip
In addition to the information in this section, see .
Use this discovery method to search Active Directory Domain Services (AD DS) to identify user accounts and associated attributes. By default, this method discovers basic information about the user account including the following:
- User name
- Unique user name (includes domain name)
- Domain
- Active Directory container names
You can view the full default list of object attributes returned by Active Directory User Discovery, and configure the method to discover additional (extended) attributes in the Active Directory User Discovery Properties dialog box on the Active Directory Attributes tab.
Actions for Active Directory User Discovery are recorded in the file adusrdis.log in the \LOGS folder on the site server.
For more information about how to configure this discovery method, see .
Heartbeat Discovery
Configurable: Yes
Enabled by default: Yes
Accounts you can use to run this method:
- Computer account of the site server
Heartbeat Discovery differs from other Configuration Manager discovery methods. It is enabled by default and runs on each computer client (instead of on a site server) to create a discovery data record (DDR). For mobile device clients, this DDR is created by the management point that is being used by the mobile device client. To help maintain the database record of Configuration Manager clients, do not disable Heartbeat Discovery. In addition to maintaining the database record, this method can force discovery of a computer as a new resource record or can repopulate the database record of a computer that was deleted from the database.
Heartbeat Discovery runs either on a schedule configured for all clients in the hierarchy, or if manually invoked, on a specific client by running the Discovery Data Collection Cycle on the Action tab in a client’s Configuration Manager program. The default schedule for Heartbeat Discovery is set to every 7 days. If you change the heartbeat discovery interval, ensure that it runs more frequently than the site maintenance task Delete Aged Discovery Data, which deletes inactive client records from the site database. You can configure the Delete Aged Discovery Data task only for primary sites.
When Heartbeat Discovery runs, it creates a DDR that contains the client’s current information. The client then copies this small file (about 1 KB in size) to a management point so that it can then processed by a primary site. The file contains the following information:
- Network location
- NetBIOS name
- Version of the client agent
- Operational status details
Heartbeat Discovery is the only discovery method that provides details about the client installation status. It does so by updating the system resource client attribute to set a value equal to Yes.
Note
Even when Heartbeat Discovery is disabled, DDRs are still created and submitted for active mobile device clients. This ensures that the Delete Aged Discovery Data task does not affect active mobile devices. This is done because when the Delete Aged Discovery Data task deletes a database record for a mobile device, it also revokes the device certificate and blocks the mobile device from connecting to management points.
Actions for Heartbeat Discovery are logged in the following locations:
- For computer clients, Heartbeat Discovery actions are recorded on the client in the InventoryAgent.log in the %Windir%\CCM\Logs folder.
- For mobile device clients, Heartbeat Discovery actions are recorded in the DMPRP.log in the %Program Files%\CCM\Logs folder of the management point that the mobile device client uses.
For more information about how to configure this discovery method, see .
Network Discovery
Configurable: Yes
Enabled by default: No
Accounts you can use to run this method:
- Computer account of the site server
Use this method to discover the topology of your network and to discover devices on your network that have an IP address. Network Discovery searches your network for IP-enabled resources by querying servers that run a Microsoft implementation of DHCP, Address Resolution Protocol (ARP) caches in routers, SNMP-enabled devices and Active Directory domains.
Before you can use Network Discovery, you must specify the level of discovery to run. You also configure one or more discovery mechanisms that enable Network Discovery to query for network segments or devices. You can also configure settings that help control discovery actions on the network. Finally, you define one or more schedules for when Network Discovery runs.
For this method to successfully discover a resource, Network Discovery must identify the IP address and the subnet mask of the resource. The following methods are used to identify the subnet mask of an object:
- Router ARP cache: Network Discovery queries the ARP cache of a router to find subnet information. Typically, data in a router ARP cache has a short time-to-live. Therefore, when Network Discovery queries the ARP cache, the ARP cache might no longer contain information about the requested object.
- DHCP: Network Discovery queries each DHCP server that you specify to discover the devices for which the DHCP server has provided a lease. Network Discovery supports only DHCP servers that run the Microsoft implementation of DHCP.
- SNMP Device: Network Discovery can directly query a SNMP device. For Network Discovery to query a device, the device must have a local SNMP agent installed. You must also configure Network Discovery to use the community name that is being used by the SNMP agent.
When discovery identifies an IP-addressable object and can determine the objects subnet mask, it creates a discovery data record (DDR) for that object. Because different types of devices can connect to the network, Network Discovery can discover resources that cannot support the Configuration Manager client software. For example, devices that can be discovered but not managed include printers and routers.
Network Discovery can return several attributes as part of the discovery record it creates. These include:
- NetBIOS name
- IP addresses
- Resource domain
- System roles
- SNMP community name
- MAC addresses
Network Discovery activity is recorded in the Netdisc.log in \Logs on the site server that runs discovery.
or more information about how to configure this discovery method, see .
Note
Complex networks and low bandwidth connections can cause Network Discovery to run slowly and generate significant network traffic. As a best practice, run Network Discovery only when the other discovery methods cannot find the resources that you have to discover. For example, use Network Discovery if you must discover workgroup computers. Workgroup computers are not discovered by other discovery methods.
Levels of Network Discovery
When you configure Network Discovery, you specify one of three levels of discovery:
| Level of discovery | Details |
|---|---|
| Topology | This level discovers routers and subnets but does not identify a subnet mask for objects. |
| Topology and client | In addition to topology, this level discovers potential clients such as computers, and resources such as printers and routers. This level of discovery attempts to identify the subnet mask of objects it finds. |
| Topology, client, and client operating system | In addition to topology and potential clients, this level attempts to discover the computer operating system name and version. This level uses Windows Browser and Windows Networking calls. |
With each incremental level, Network Discovery increases its activity and network bandwidth usage. Consider the network traffic that can be generated before you enable all aspects of Network Discovery.
For example, when you first use Network Discovery, you might start with only the topology level to identify your network infrastructure. Then, you could reconfigure Network Discovery to discover objects and their device operating systems. You could also configure settings that limit Network Discovery to a specific range of network segments to discover objects in network locations that you require and avoid unnecessary network traffic and discovery of objects from edge routers or from outside your network.
Network Discovery Options
To enable Network Discovery to search for IP-addressable devices, you must configure one or more of the following options that specify how to query for devices.
Note
Network Discovery runs in the context of the computer account of the site server that runs discovery. If the computer account does not have permissions to an untrusted domain, both the Domain and DHCP server configurations can fail to discover resources.
DHCP:
Specify each DHCP server that you want Network Discovery to query. (Network Discovery supports only DHCP servers that run the Microsoft implementation of DHCP)
- Network Discovery retrieves information by using remote procedure calls to the database on the DHCP server.
- Network Discovery can query both 32-bit and 64-bit DHCP servers for a list of devices that are registered with each server.
- For Network Discovery to successfully query a DHCP server, the computer account of the server that runs discovery must be a member of the DHCP Users group on the DHCP server. For example, this level of access exists when one of the following is true:
- The specified DHCP server is the DHCP server of the server that runs discovery.
- The computer that runs discovery and the DHCP server are in the same domain.
- A two-way trust exists between the computer that runs discovery and the DHCP server.
- The site server is a member of the DHCP users group.
- When Network Discovery enumerates a DHCP server, it does not always discover static IP addresses. Network Discovery does not find IP addresses that are part of an excluded range of IP addresses on the DHCP server, and does not discover IP addresses that are reserved for manual assignment.
Domains:
Specify each domain that you want Network Discovery to query.
- The computer account of the site server that runs discovery must have permissions to read the domain controllers in each specified domain.
- To discover computers from the local domain, you must enable the Computer Browser service on at least one computer that is located on the same subnet as the site server that runs Network Discovery.
- Network Discovery can discover any computer that you can view from your site server when you browse the network,
- Network Discovery retrieves the IP address and then uses an Internet Control Message Protocol echo request to ping each device that it finds. The ping command helps determine which computers are currently active.
SNMP Devices:
Specify each SNMP device that you want Network Discovery to query.
- Network Discovery retrieves the ipNetToMediaTable value from any SNMP device that responds to the query. This value returns arrays of IP addresses that are client computers or other resources such as printers, routers, or other IP-addressable devices.
- To query a device, you must specify the IP Address or NetBIOS name of the device.
- You must configure Network Discovery to use the community name of the device, or the device rejects the SNMP-based query.
Limiting Network Discovery
When Network Discovery queries an SNMP device on the edge of you network, it can identify information about subnets and SNMP devices that are outside your immediate network. Use the following information to limit Network Discovery by configuring the SNMP devices that discovery can communicate with, and by specifying the network segments to query.
Subnets:
Configure the subnets that Network Discovery queries when it uses the SNMP and DHCP options. Only the enabled subnets are searched by these two options.
For example, a DHCP request can return devices from locations across your whole network. If you want to only discover devices on a specific subnet, specify and enable that specific subnet on the Subnets tab in the Network Discovery Properties dialog box. When you specify and enable subnets, you limit future DHCP and SNMP discovery operations to those subnets.
Note
Subnet configurations do not limit the objects that the Domains discovery option discovers.
SNMP Community names:
To enable Network Discovery to successfully query a SNMP device, configure Network Discovery with the community name of the device. If Network Discovery is not configured by using the community name of the SNMP device, the device rejects the query.
Maximum hops:
When you configure the maximum number of router hops, you limit the number of network segments and routers that Network Discovery can query by using SNMP.
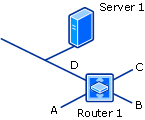
- The number of hops that you configure limits the number of additional devices and network segments that Network Discovery can query.For example, a topology-only discovery with 0 (zero) router hops discovers the subnet on which the originating server resides, and includes any routers on that subnet.
The following diagram shows what a topology-only Network Discovery finds when it runs on Server 1 with 0 router hops specified: subnet D and Router 1.
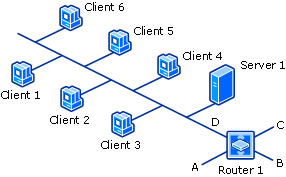
The following diagram shows what a topology and client Network Discovery finds when it runs on Server 1 with 0 router hops specified: subnet D and Router 1, and all potential clients on subnet D.
To get a better idea of how additional router hops can increase the amount of network resources that are discovered, consider the following network:
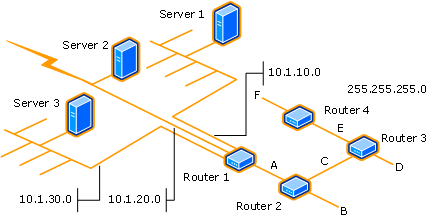
Running a topology-only Network Discovery from Server 1 with one router hop discovers the following:
- Router 1 and subnet 10.1.10.0 (found with zero hops).
- Subnets 10.1.20.0 and 10.1.30.0, subnet A, and Router 2 (found on the first hop).
Warning
Each increase to the number of router hops can significantly increase the number of discoverable resources and increase the network bandwidth that Network Discovery uses.
Server Discovery
Configurable: No
In addition to the user-configurable discovery methods, Configuration Manager also uses a process named Server Discovery (SMS_WINNT_SERVER_DISCOVERY_AGENT). This discovery method creates resource records for computers that are site systems, such as a computer that is configured as a management point.
Common features of Active Directory Group, System, and User Discovery
This section provides information about features that are common to the following discovery methods:
- Active Directory Group Discovery
- Active Directory System Discovery
- Active Directory User Discovery
Note
The information in this section does not apply to Active Directory Forest Discovery.
These three discovery methods are similar in configuration and operation, and can discover computers, users, and information about group memberships of resources that are stored in Active Directory Domain Services. The discovery process is managed by a discovery agent that runs on the site server at each site where discovery is configured to run. You can configure each of these discovery methods to search one or more Active Directory locations as location instances in the local forest or remote forests.
When discovery searches an untrusted forest for resources, the discovery agent must be able to resolve the following to be successful:
- To discover a computer resource with Active Directory System Discovery, the discovery agent must be able to resolve the FQDN of the resource. If it cannot resolve the FQDN, it will then attempt to resolve the resource by its NetBIOS name.
- To discover user or group resource with Active Directory User Discovery or Active Directory Group Discovery, the discovery agent must be able to resolve the FQDN of the domain controller name you specify for the Active Directory location.
For each location that you specify, you can configure individual search options such as enabling a recursive search of the locations Active Directory child containers. You can also configure a unique account to use when it searches that location. This provides flexibility in configuring a discovery method at one site to search multiple Active Directory locations across multiple forests, without having to configure a single account that has permissions to all locations.
When each of these three discovery methods run at a specific site, the Configuration Manager site server at that site contacts the nearest domain controller in the specified Active Directory forest to locate Active Directory resources. The domain and forest can be in any supported Active Directory mode, and the account that you assign to each location instance must have Read access permission to the specified Active Directory locations. Discovery searches the specified locations for objects and then attempts to collect information about those objects. A discovery data record (DDR) is created when sufficient information about a resource can be identified. The required information varies depending on the discovery method that is being used.
If you configure the same discovery method to run at different Configuration Manager sites to take advantage of querying local Active Directory servers, you can configure each site with a unique set of discovery options. Because discovery data is shared with each site in the hierarchy, avoid overlap between these configurations to efficiently discover each resource a single time. For smaller environments, you might consider running each discovery method at only one single site in your hierarchy to reduce administrative overhead and the potential for multiple discovery actions to rediscover the same resources. When you minimize the number of sites that run discovery you can reduce the overall network bandwidth that is being used by discovery, and reduce the overall number of DDRs that are created and must be processed by your site servers.
Many of the discovery method configurations are self-explanatory. Use the following sections for more information about the discovery options that might require additional information before you configure them.
The following options are available for use with multiple Active Directory discovery methods:
Delta Discovery
Available for:
- Active Directory Group Discovery
- Active Directory System Discovery
- Active Directory User Discovery
Delta Discovery is not an independent discovery method but an option available for the applicable discovery methods. Delta Discovery searches specific Active Directory attributes for changes that were made since the last full discovery cycle of the applicable discovery method. This search uses fewer resources than a full discovery cycle, and the attribute changes are submitted to the Configuration Manager database to update the discovery record of the resource.
By default, Delta Discovery runs on a five-minute cycle. This is much more frequently than the typical schedule for a full discovery cycle. This frequent cycle is possible because Delta Discovery uses fewer site server and network resources than a full discovery cycle does. When you use Delta Discovery, you can reduce the frequency of the full discovery cycle for that discovery method.
The following are the most common changes that Delta Discovery detects:
- New computers or users added to Active Directory
- Changes to basic computer and user information
- New computers or users that are added to a group
- Computers or users that are removed from a group
- Changes to System group objects
Although Delta Discovery can detect new resources, and changes to group membership, it cannot detect when a resource has been deleted from your Active Directory. DDRs created by Delta Discovery are processed similarly to the DDRs that are created by a full discovery cycle.
You configure Delta Discovery on the Polling Schedule tab in the properties for each discovery method.
Filter stale computer records by domain logon
Available for:
- Active Directory Group Discovery
- Active Directory System Discovery
You can configure discovery to exclude computers with a stale computer record based on the last domain logon of the computer. When this option is enabled, Active Directory System Discovery evaluates each computer it identifies. Active Directory Group Discovery evaluates each computer that is a member of a group that is discovered.
To use this option:
- Computers must be configured to update the lastLogonTimeStamp attribute in Active Directory Domain Services.
- The Active Directory domain functional level must be set to Windows Server 2003 or later.
When configuring the time after the last logon that you want to use for this setting, consider the interval for replication between domain controllers.
You configure filtering on the Option tab in both Active Directory System Discovery Properties and Active Directory Group Discovery Properties dialog boxes by selecting the option Only discover computers that have logged on to a domain in a given period of time.
Warning
When you configure this filter and the Filter stale records by computer password, computers that meet the criteria of either filter are excluded from discovery.
Filter stale records by computer password
Available for:
- Active Directory Group Discovery
- Active Directory System Discovery
You can configure discovery to exclude computers with a stale computer record based on the last computer account password update by the computer. When this option is enabled, Active Directory System Discovery evaluates each computer it identifies. Active Directory Group Discovery evaluates each computer that is a member of a group that is discovered.
To use this option:
- Computers must be configured to update the pwdLastSet attribute in Active Directory Domain Services.
When configuring this option, consider the interval for updates to this attribute in addition to the replication interval between domain controllers.
You configure filtering on the Option tab in both Active Directory System Discovery Properties and Active Directory Group Discovery Properties dialog boxes by selecting the option Only discover computers that have updated their computer account password in a given period of time.
Warning
When you configure this filter and the Filter stale records by domain logon, computers that meet the criteria of either filter are excluded from discovery.
Search customized Active Directory attributes
Available for:
- Active Directory System Discovery
- Active Directory User Discovery
Each discovery method supports a unique list of Active Directory attributes that can be discovered.
You can view and configure the list of customized attributes on the Active Directory Attributes tab in both the Active Directory System Discovery Properties and Active Directory User Discovery Properties dialog boxes.
Configure discovery methods for System Center Configuration Manager
Applies to: System Center Configuration Manager (Current Branch)
You configure discovery methods to run at a System Center Configuration Manager site to find resources you can manage from your network infrastructure and Active Directory. This requires you to enable and then configure each method you want to use to search your environment. (You can also disable a method by using the same procedure you use to enable it.) The only exceptions to this are Heartbeat Discovery and Server Discovery:
- By default, Heartbeat Discovery is already enabled when you install a Configuration Manager primary site, and configured to run on a basic schedule. You should keep Heartbeat Discovery enabled as this method ensures that the discovery data records (DDRs) for devices are up-to-date. For more information about Heartbeat discovery, see
- Server Discovery is an automatic discovery method that finds computers you use as site systems, and is not a method you can configure, or disable.
To enable any configurable discovery method:
- In the Configuration Manager console, click Administration > Hierarchy Configuration, and click Discovery Methods.
- Select the discovery method for the site where you want to enable discovery.
- On the Home tab, in the Properties group, click Properties, and then on the General tab, select the Enable
check box. If this check box is already selected, you can disable the discovery method by clearing the check box. - Click OK to save the configuration.
Configure Active Directory Forest Discovery
To complete the configuration of Active Directory Forest Discovery, you must configure settings in two locations:
- In the Discovery Methods node, you can enable this discovery method, set a polling schedule, and select whether discovery automatically creates boundaries for the Active Directory sites and subnets that it discovers.
- In the Active Directory Forests node, you can add forests that you want to discover, enable discovery of Active Directory sites and subnets in that forest, configure settings that enable Configuration Manager sites to publish their site information to the forest, and assign an account to use as the Active Directory Forest Account for each forest.Use the following procedures to enable Active Directory Forest discovery, and to configure individual forests for use with Active Directory Forest Discovery.
To enable Active Directory Forest Discovery
- In the Configuration Manager console, click Administration > Hierarchy Configuration, and then click Discovery Methods.
- Select the Active Directory Forest Discovery method for the site where you want to configure discovery.
- On the Home tab, in the Properties group, click Properties.
- On the General tab, select the check box to enable discovery, or you can configure discovery now, and return to enable discovery later.
- Specify options to create site boundaries for discovered locations.
- Specify a schedule for when discovery runs.
- When you complete the configuration of Active Directory Forest Discovery for this site, click OK to save the configuration.
To configure a forest for Active Directory Forest Discovery
- In the Administration workspace, click Active Directory Forests. If Active Directory Forest Discovery has previously run, you see each discovered forest in the results pane. The local forest and any trusted forests are discovered when Active Directory Forest Discovery runs. Only untrusted forests must be manually added.
- To configure a previously discovered forest, select the forest in the results pane, and then on the Home tab, in the Properties group, click Properties to open the forest properties. Continue with step 3.
- To configure a new forest that is not listed, on the Home tab, in the Create group, click Add Forest to open the Add Forests dialog box. Continue with step 3.
- On the General tab, complete configurations for the forest that you want to discover and specify the Active Directory Forest Account.
Note
Active Directory Forest Discovery requires a global account to discover and publish to untrusted forests. If you do not use the computer account of the site server, you can only select a global account. - If you plan to allow sites to publish site data to this forest, on the Publishing tab, complete configurations for publishing to this forest.
Note
If you enable sites to publish to a forest, you must extend the Active Directory schema of that forest for Configuration Manager, and the Active Directory Forest Account must have Full Control permissions to the System container in that forest. - When you complete the configuration of this forest for use with Active Directory Forest Discovery, click OK to save the configuration.
Configure Active Directory Discovery for Computers, Users, or Groups
Use the information in the following sections to configure discovery of computers, users, or groups, by using one of the following discovery methods:
- Active Directory Group Discovery
- Active Directory System Discovery
- Active Directory User Discovery
Note
The information in this section does not apply to Active Directory Forest Discovery.
While each of these discovery methods is independent of the others, they share similar options. For more information about these configuration options, see .
Warning
The Active Directory polling by each of these discovery methods can generate significant network traffic. Consider scheduling each discovery method to run at a time when this network traffic does not adversely affect business uses of your network.
To configure Active Directory Group Discovery
- In the Configuration Manager console, click Administration > Hierarchy Configuration, and then click Discovery Methods.
- Select the Active Directory Group Discovery method for the site where you want to configure discovery.
- On the Home tab, in the Properties group, click Properties.
- On the General tab, select the check box to enable discovery, or you can configure discovery now, and return to enable discovery later.
- Click Add to configure a discovery scope, select either Groups or Location, and complete the following configurations in the Add Groups, or Add Active Directory Location dialog box:
- Specify a Name for this discovery scope.
- Specify an Active Directory Domain or Location to search:
- If you selected Groups, specify one or more Active Directory groups to be discovered.
- If you selected Location, specify an Active Directory container as a location to be discovered. You can also enable a recursive search of Active Directory child containers for this location.
- Specify the Active Directory Group Discovery Account that is used to search this discovery scope.
- Click OK to save the discovery scope configuration.
- Repeat step 6 for each additional discovery scope that you want to define.
- On the Polling Schedule tab, configure both the full discovery polling schedule and delta discovery.
- Optionally, on the Option tab, you can configure options to filter out, or exclude, stale computer records from discovery, and to discover the membership of distribution groups.
Note
By default, Active Directory Group Discovery discovers only the membership of security groups. - When you have finished configuring Active Directory Group Discovery for this site, click OK to save the configuration.
To configure Active Directory System Discovery
- In the Configuration Manager console, click Administration > Hierarchy Configuration, and then click Discovery Methods.
- Select the method for the site where you want to configure discovery.
- On the Home tab, in the Properties group, click Properties.
- On the General tab, select the check box to enable discovery, or you can configure discovery now, and then return to enable discovery later.
- Click the New icon
 to specify a new Active Directory container, and in the Active Directory Container dialog box, complete the following configurations:
- Specify one or more locations to search.
- For each location, specify options that modify the search behavior.
- For each location, specify the account to use as the Active Directory Discovery Account.
Tip
For each location that you specify, you can configure a set of discovery options and a unique Active Directory Discovery Account. - Click OK to save the Active Directory container configuration.
- On the Polling Schedule tab, configure both the full discovery polling schedule and delta discovery.
- Optionally, on the Active Directory Attributes tab, you can configure additional Active Directory attributes for computers that you want to discover. The default object attributes are also listed.
- Optionally, on the Option tab, you can configure options to filter out, or exclude, stale computer records from discovery.
- When you have finished configuring Active Directory System Discovery for this site, click OK to save the configuration.
To configure Active Directory User Discovery
- In the Configuration Manager console, click Administration > Hierarchy Configuration, and then click Discovery Methods.
- Select the Active Directory User Discovery method for the site where you want to configure discovery.
- On the Home tab, in the Properties group, click Properties.
- On the General tab, select the check box to enable discovery, or you can configure discovery now, and return to enable discovery later.
- Click the New icon to specify a new Active Directory container, and in the Active Directory Container dialog box, complete the following configurations:
- Specify one or more locations to search.
- For each location, specify options that modify the search behavior.
- For each location, specify the account to use as the Active Directory Discovery Account.
Note
For each location that you specify, you can configure a unique set of discovery options and a unique Active Directory Discovery Account. - Click OK to save the Active Directory container configuration.
- On the Polling Schedule tab, configure both the full discovery polling schedule and delta discovery.
- Optionally, on the Active Directory Attributes tab, you can configure additional Active Directory attributes for computers that you want to discover. The default object attributes are also listed.
- When you have finished configuring Active Directory User Discovery for this site, click OK to save the configuration.
Configure Heartbeat Discovery
By default, Heartbeat Discovery is enabled when you install a Configuration Manager primary site. As a result, you only have to configure the schedule for how often clients send the Heartbeat Discovery data record (DDRs) to a management point when you do not want to use the default of every 7 days.
Note
If both client push installation and the site maintenance task for Clear Install Flag are enabled at the same site, set the schedule of Heartbeat Discovery to be less than the Client Rediscovery period of the Clear Install Flag site maintenance task. For more information about site maintenance tasks, see .
To configure the Heartbeat Discovery schedule
- In the Configuration Manager console, click Administration > Hierarchy Configuration, and then click Discovery Methods
- Select Heartbeat Discovery for the site where you want to configure Heartbeat Discovery.
- On the Home tab, in the Properties group, click Properties.
- Configure the frequency with which clients submit a Heartbeat discovery data records (DDRs), and then click OK to save the configuration.
Configure Network Discovery
Use the information in the following sections to help you configure Network Discovery.
About configuring Network Discovery
Before you configure Network Discovery, you must understand the following:
- Available levels of Network Discovery
- Available Network Discovery options
- Limiting Network Discovery on the network
For more information, see the section .
The following sections provide information about common configurations for Network Discovery. You can configure one or more of these configurations for use during the same discovery run. If you use multiple configurations, you must plan for the interactions that can affect the discovery results.
For example, you might want to discover all SNMP devices that use a specific SNMP Community name. Additionally, for the same discovery run, you might disable discovery on a specific subnet. When discovery runs, Network Discovery does not discover the SNMP devices with the specified community name on the subnet that you have disabled.
Determine your network topology
You can use a topology-only discovery to map your network. This kind of discovery does not discover potential clients. The topology-only Network Discovery relies on SNMP.
When mapping your network topology, you must configure the Maximum hops on the SNMP tab in the Network Discovery Properties dialog box. Just a few hops can help control the network bandwidth that is used when discovery runs. As you discover more of your network, you can increase the number of hops to gain a better understanding of your network topology.
After you understand your network topology, you can configure additional properties for Network Discovery to discover potential clients and their operating systems while you are using available configurations to limit the network segments that Network Discovery can search.
Limit searches by using subnets
You can configure Network Discovery to search specific subnets during a discovery run. By default, Network Discovery searches the subnet of the server that runs discovery. Any additional subnets that you configure and enable apply only to Simple Network Management Protocol (SNMP) and Dynamic Host Configuration Protocol (DHCP) search options. When Network Discovery searches domains, it is not limited by configurations for subnets.
If you specify one or more subnets on the Subnets tab in the Network Discovery Properties dialog box, only the subnets that are marked as Enabled are searched.
When you disable a subnet, it is excluded from discovery, and the following conditions apply:
- SNMP-based queries do not run on the subnet
- DHCP servers do not reply with a list of resources located on the subnet
- Domain-based queries can discover resources that are located on the subnet
Search a specific domain
You can configure Network Discovery to search a specific domain or set of domains during a discovery run. By default, Network Discovery searches the local domain of the server that runs discovery.
If you specify one or more domains on the Domains tab in the Network Discovery Properties dialog box, only the domains that are marked as Enabled are searched.
When you disable a domain, it is excluded from discovery, and the following conditions apply:
- Network Discovery does not query domain controllers in that domain
- SNMP-based queries can still run on subnets in the domain
- DHCP servers can still reply with a list of resources located in the domain
Limit searches by using SNMP Community names
You configure Network Discovery to search a specific SNMP community or set of communities during a discovery run. By default, the community name of public is configured for use.
Network Discovery uses community names to gain access to routers that are SNMP devices. A router can supply Network Discovery with information about other routers and subnets that are linked to the first router.
Note
SNMP community names resemble passwords. Network Discovery can get information only from an SNMP device for which you have specified a community name. Each SNMP device can have its own community name, but often the same community name is shared among several devices. Additionally, most SNMP devices have a default community name of public. However, some organizations delete the public community name from their devices as a security precaution.
If multiple SNMP communities are displayed on the SNMP tab in the Network Discovery Properties dialog box, Network Discovery searches them in the order in which they are displayed. To help minimize network traffic that is generated by attempts to contact a device by using different names, ensure that the most frequently used names are at the top of the list.
Note
In addition to using the SNMP Community name, you can specify the IP address or resolvable name of a specific SNMP device. You configure the IP address or resolvable name for a specific device on SNMP Devices tab in the Network Discovery Properties dialog box.
Search a specific DHCP server
You can configure Network Discovery to use a specific DHCP server or multiple servers to discover DHCP clients during a discovery run.
Network Discovery searches each DHCP server that you specify on the DHCP tab in the Network Discovery Properties dialog box. If the server that is running discovery leases its IP address from a DHCP server, you can configure discovery to search that DHCP server by selecting the Include the DHCP server that the site server is configured to use check box.
Note
To successfully configure a DHCP server in Network Discovery, your environment must support IPv4. You cannot configure Network Discovery to use a DHCP server in a native IPv6 environment.
How to configure Network Discovery
Use the following procedures to first discover only your network topology, and then to configure Network Discovery to discover potential clients by using one or more of the available Network Discovery options.
To determine your network topology
- In the Configuration Manager console, click Administration > Hierarchy Configuration, and then click Discovery Methods
- Select Network Discovery for the site where you want to run Network Discovery.
- On the Home tab, in the Properties group, click Properties.
- On the General tab, select the Enable network discovery check box, and then select Topology from the Type of discovery options.
- On the Subnets tab, select the Search local subnets check box.
Tip
If you know the specific subnets that constitute your network, you can clear the Search local subnets check box and use the New icon to add the specific subnets that you want to search. For large networks, it is often best to search only one or two subnets at a time to minimize the use of network bandwidth. - On the Domains tab, select the Search local domain check box.
- On the SNMP tab, use the Maximum hops drop-down list to specify how many router hops Network Discovery can take in mapping your topology.
Tip
When you first map your network topology, configure just a few router hops to minimize the use of network bandwidth.
- On the Schedule tab, click the New icon to set a schedule for running Network Discovery.
Note
You cannot assign a different discovery configuration to separate Network Discovery schedules. Each time Network Discovery runs, it uses the current discovery configuration. - Click OK to accept the configurations. Network Discovery runs at the scheduled time.
To configure Network Discovery
- In the Configuration Manager console, click Administration > Hierarchy Configuration, and then click Discovery Methods
- Select Network Discovery for the site where you want to run Network Discovery.
- On the Home tab, in the Properties group, click Properties.
- On the General tab, select the Enable network discovery check box, and then select the type of discovery that you want to run from the Type of discovery options.
- To configure discovery to search subnets, click the Subnets tab, and on the Subnets tab, configure one or more of the following options:
- To run discovery on subnets that are local to the computer that runs discovery, select the Search local subnets check box.
- To search a specific subnet, the subnet must be listed in Subnets to search, and have a Search value of Enabled:
- If the subnet is not listed, click the New icon. In the New Subnet Assignment dialog box, enter the Subnet and Mask information, and then click OK. By default, a new subnet is enabled for search.
- To change the Search value for a listed subnet, select the subnet, and then click the Toggle icon to toggle the value between Disabled and Enabled.
- To configure discovery to search domains, click the Domains tab, and on the Domains tab, configure one or more of the following options:
- To run discovery on the domain of the computer that runs discovery, select the Search local domain check box.
- To search a specific domain, the domain must be listed in Domains and have a Search value of Enabled:
- If the domain is not listed, click the New icon, and in the Domain Properties dialog box, enter the Domain information, and then click OK. By default, a new domain is enabled for search.
- To change the Search value for a listed domain, select the domain, and then click the Toggle icon to toggle the value between Disabled and Enabled.
- To configure discovery to search specific SNMP community names for SNMP devices, click the SNMP tab, and on the SNMP tab, configure one or more of the following options:
- To add an SNMP community name to the list of SNMP Community names, click the New icon, and in the New SNMP Community Name dialog box, specify the Name of the SNMP community, and then click OK.
- To remove an SNMP community name, select the community name, and then click the Delete icon
 .
. - To adjust the search order of SNMP community names, select a community name, and then click the Move Item Up icon
 , or the Move Item Down icon
  . When discovery runs, community names are searched in a top-to-bottom order.
Note
Network Discovery uses SNMP community names to gain access to routers that are SNMP devices. A router can inform Network Discovery about other routers and subnets linked to the first router.- SNMP community names resemble passwords.
- Network Discovery can get information only from an SNMP device for which you have specified a community name.
- Each SNMP device can have its own community name, but often the same community name is shared among several devices
- Most SNMP devices have a default community name of Public which can be used if you do not know any other community names. However, some organizations delete the Public community name from their devices as a security precaution.
- To configure the maximum number of router hops for use by SNMP searches, click the SNMP tab, and on the SNMP tab, select the number of hops from the Maximum hops drop-down list.
- To configure SNMP Devices, click the SNMP Devices tab, and on the SNMP tab, if the device is not listed, click the New icon. In the New SNMP Device dialog box, specify the IP address or device name of the SNMP device, and then click OK.
Note
If you specify a device name, Configuration Manager must be able to resolve the NetBIOS name to an IP address. - To configure discovery to query specific DHCP servers for DHCP clients, click the DHCP tab, and on the DHCP tab, configure one or more of the following options:
- To query the DHCP server on the computer that is running discovery, select the Always use the site server’s DHCP server check box.
Note
To use this option, the server must lease its IP address from a DHCP server and cannot use a static IP address. - To query a specific DHCP server, click the New icon, and in the New DHCP Server dialog box, specify the IP address or server name of the DHCP server, and then click OK.
Note
If you specify a server name, Configuration Manager must be able to resolve the NetBIOS name to an IP address.
- To configure when discovery runs, click the Schedule tab, and on the Schedule tab, click the New icon to set a schedule for running Network Discovery.You can configure multiple schedules for Network Discovery that include multiple recurring schedules and multiple schedules that have no recurrence.
Note
If multiple schedules are displayed on the Schedule tab at the same time, all schedules result in a run of Network Discovery as it is configured at the time indicated in the schedule. This is also true for recurring schedules. - Click OK to save your configurations.
How to verify that Network Discovery has finished
The time that Network Discovery requires to complete can vary depending on a variety of factors. These factors can include one or more of the following:
- The size of your network
- The topology of your network
- The maximum number of hops that are configured to find routers in the network
- The type of discovery that is being run
Because Network Discovery does not create messages to alert you when discovery has finished, you can use the following procedure to verify when discovery has finished.
To verify that Network Discovery has finished
- In the Configuration Manager console, click Monitoring.
- In the Monitoring workspace, expand System Status, and then click Status Message Queries.
- Select All Status Messages.
- On the Home tab, in the Status Message Queries group, click Show Messages.
- Select the Select date and time drop-down list and select a value that includes how long ago the discovery started, and then click OK to open the Configuration Manager Status Message Viewer.
Tip
You can also use the Specify date and time option to select a given date and time that you ran discovery. This option is useful when you ran Network Discovery on a given date and want to retrieve messages from only that date. - To validate that Network Discovery has finished, search for a status message that has the following details:
- Message ID: 502
- Component: SMS_NETWORK_DISCOVERY
- Description: This component stopped
If this status message is not present, Network Discovery has not finished. - To validate when Network Discovery started, search for a status message that has the following details:
- Message ID: 500
- Component: SMS_NETWORK_DISCOVERY
- Description: This component started
This information verifies that Network Discovery started. If this information is not present, reschedule Network Discovery.
Deploying SCCM 2012 Part 7 – Configuring Discovery and Boundaries.
Deploying SCCM 2012 Part 7 – Configuring Discovery and Boundaries.
What are Discovery Methods in Configuration Manager 2012 – System Center 2012 Configuration Manager discovery identifies computer and user resources that you can manage by using Configuration Manager. It can also discover the network infrastructure in your environment. Discovery creates a discovery data record (DDR) for each discovered object and stores this information in the Configuration Manager database. When a resource is discovered the information about the resource is put in a file that is referred to as a discovery data record (DDR). DDRs are processed by site servers and entered into the Configuration Manager database where they are then replicated by database-replication with all sites. More information on configuration Manager 2012 Discovery Methods is here :- http://technet.microsoft.com/en-us/library/gg712308.aspx.
In Part 1 we saw the installation of Active Directory Domain Services. In Part 2 we created the AD container and delegated the permissions on it. In Part 3 we installed pre-requisites for SCCM server. In Part 4 we installed SQL server, updated the service pack and cumulative update patch. In Part 5 we installed WSUS server role, Configured the firewall to add exceptions to allow the Client Push, Open the SQL ports 1433 and 4022. In Part 6 we installed the SCCM 2012.
Types of Discovery Methods:
Active Directory Forest Discovery – As the name suggests it discovers Active Directory sites and subnets, and then creates Configuration Manager boundaries for each site and subnet from the forests which have been configured for discovery. With this discovery method you are able to automatically create the Active Directory or IP subnet boundaries that are within the discovered Active Directory Forests.
Active Directory Group Discovery – The Active Directory Group Discovery discovers the groups from the defined location in the Active Directory. The Discovery Process discovers local, global, and universal security groups, the membership within these groups. When you configure the Group discovery you have the option to discover the membership of distribution groups. With the Active Directory Group Discovery you can also discover the computers that have logged in to the domain in a given period of time.
Active Directory System Discovery – If you want to discover the computers in your organization from specified locations in Active Directory Domain Services then we use Active Directory System Discovery. In order to push the sccm clients into the computers, the resources must be discovered first. There is an option to discover the computers that have logged on to a domain in given period of time, this way you won’t discover obsolete computer accounts from the Active Directory.
Active Directory User Discovery – This Discovery process discovers the user accounts from your Active Directory domain. You will have to specify the Active Directory container to search for the user accounts. There are some good options to discover the user accounts like the option to discover the user objects based on the attributes, recursively search AD child containers, discover objects within the AD groups.
HeartBeat Discovery – The HeartBeat Discovery runs on every Configuration Manager client and is used by Active Configuration Manager clients to update their discovery records in the database. The records (Discovery Data Records) are sent to the management point in specified duration of time. Heartbeat Discovery can force discovery of a computer as a new resource record, or can repopulate the database record of a computer that was deleted from the database. Note that the HeartBeat Discovery is enabled by default and is scheduled to run every 7 days.
Network Discovery – The Network Discovery searches your network infrastructure for network devices that have an IP address. It can search the domains, SNMP devices and DHCP servers to find the resources. It also discovers devices that might not be found by other discovery methods. This includes printers, routers, and bridges.
Network Discovery – The Network Discovery searches your network infrastructure for network devices that have an IP address. It can search the domains, SNMP devices and DHCP servers to find the resources. It also discovers devices that might not be found by other discovery methods. This includes printers, routers, and bridges.
To discover the resources we will now enable the following Discovery Methods:
- Active Directory Forest Discovery
- Active Directory Group Discovery
- Active Directory System Discovery
- Active Directory User Discovery
Active Directory Forest Discovery.
Launch the System Center 2012 Configuration Manager Console. On the left pane select the Administration, expand Hierarchy Configuration, Select Discovery Methods. On the right pane double click “Active Directory Forest Discovery”. Check all the boxes to enable the AD Forest Discovery. With this all the Active Directory site boundaries are created automatically along with IP address boundaries. Click on Apply.

When you click on Apply, it asks you to run the full discovery as soon as possible. Click on Yes.

Active Directory Group Discovery – Double click the Active Directory Group Discovery and Check the box which says “Enable Active Directory Group Discovery“. Once you do that at the bottom you must add the Groups or the Location.
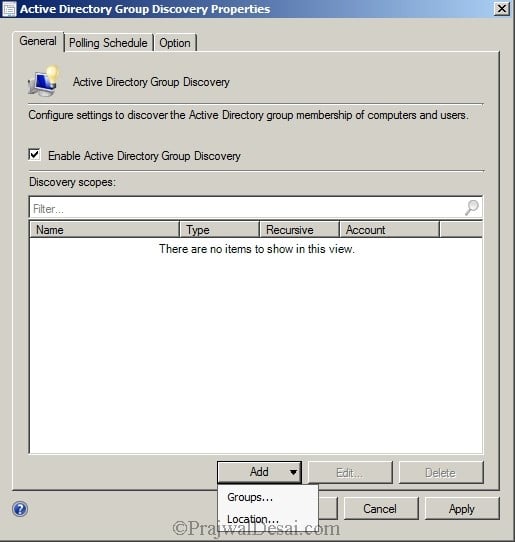
If you are choosing the first option i.e. groups, then you can add the multiple groups by specifying the distinguished name of the group. I prefer to choose the option “Location”.

Click Browse to specify the location. Select the Active Directory Container. I prefer to select the Domain PRAJWAL. Click OK.

Provide a valid name to the Groups and click OK.
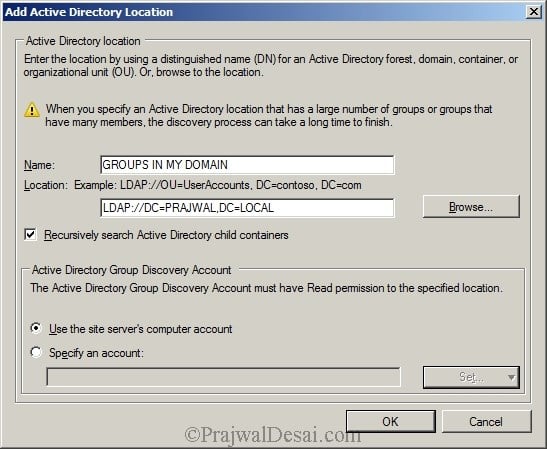
You should find the group name that you entered in the above step. Lets take a look at Polling Schedule.

Polling schedule is how often the Configuration Manager polls the AD to find the groups. You can change the polling schedule by clicking on Schedule button.
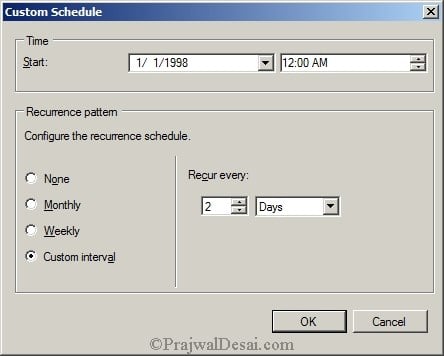
We will change “Recur Every” from 7 days to 2 days. So that means the Active Directory Group Discovery will Poll the AD for groups, every 2 days. Click OK.

Click on Option. Check all the check boxes. The first option will discover computers that are active since 90 days. The second option will discover computers that have changed/updated their computer account password in a period of 90 days. The third option discovers the membership of distribution groups. Click Apply and OK .

Active Directory System Discovery – Right Click Active Directory System Discovery and click properties.

Click Enable Active Directory System Discovery. To add the Active Directory Containers Click on the Orange color icon.

Click on Browse and select the domain. click OK.
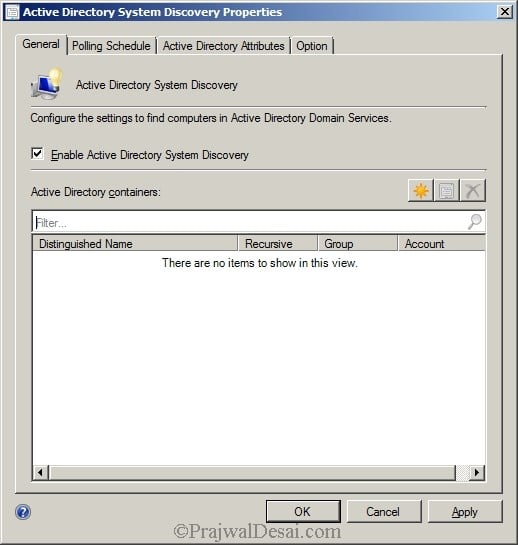
Click on Option and make the changes shown in the below screenshot.

Click on Apply.Run the full discovery by clicking Yes. Click OK and close the properties page.

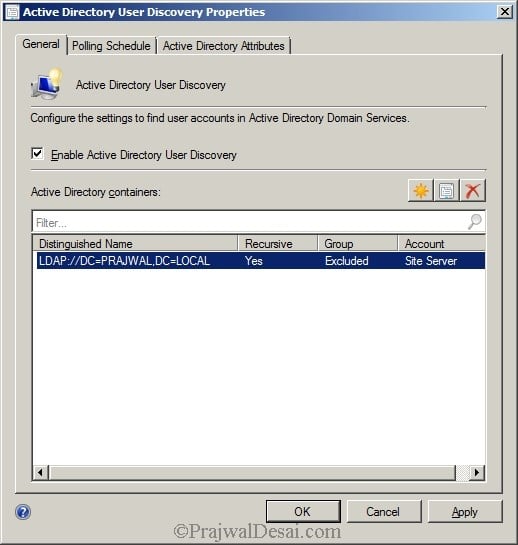
Active Directory User Discovery – Double click the Active Directory User Discovery, Enable the active directory User Discovery. Add the Active Directory Containers. Click OK.

Concept Of Boundaries – As per Microsoft, a boundary is a network location on the intranet that can contain one or more devices that you want to manage. Boundaries can be an IP subnet, Active Directory site name, IPv6 Prefix, or an IP address range, and the hierarchy can include any combination of these boundary types. To use a boundary, you must add the boundary to one or more boundary groups. Boundary groups are collections of boundaries. By using boundary groups, clients on the intranet can find an assigned site and locate content when they have to install software, such as applications, software updates, and operating system images. When we run the Active Directory Forest Discovery, the Boundaries are discovered Automatically.
Lets take a look in the SCCM 2012 Console and find out whether a Boundary has been created or not. Bingo, the boundary has been discovered successfully.
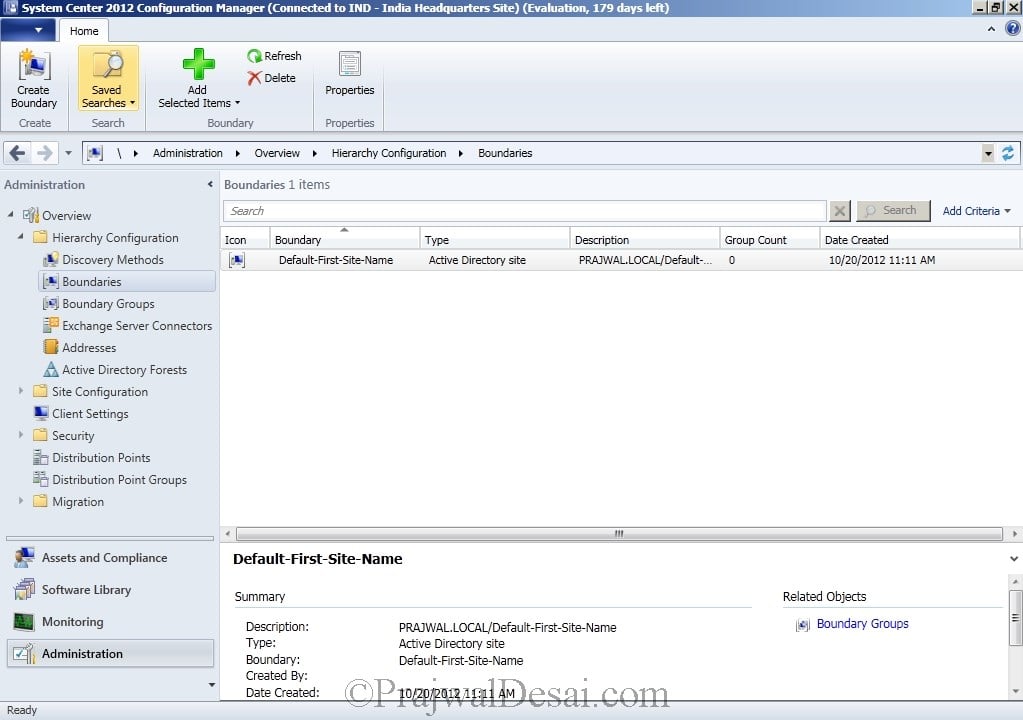
Now we need to add the Boundary to the Boundary groups. To do so Select Boundary Groups, right Click and create a boundary group.

Provide a name as First Boundary Group. Click Add.

Select the boundary. In our case there is only one discovered boundary and that is the Default-First-Site-Name. Click OK.
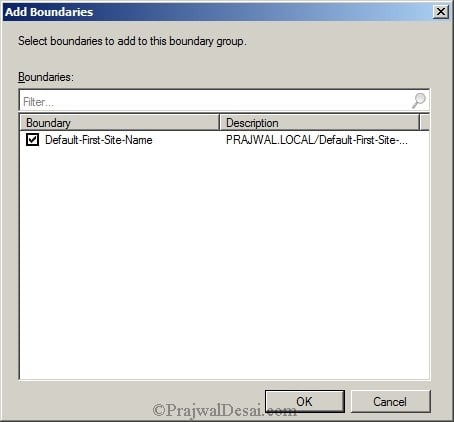
Click on references tab, check Use this Boundary group for site assignment. To add the site system servers, click Add and select the Site System Server. Click OK.

Once you do the above step, the Boundary Group must be seen in the console under Boundary Groups.
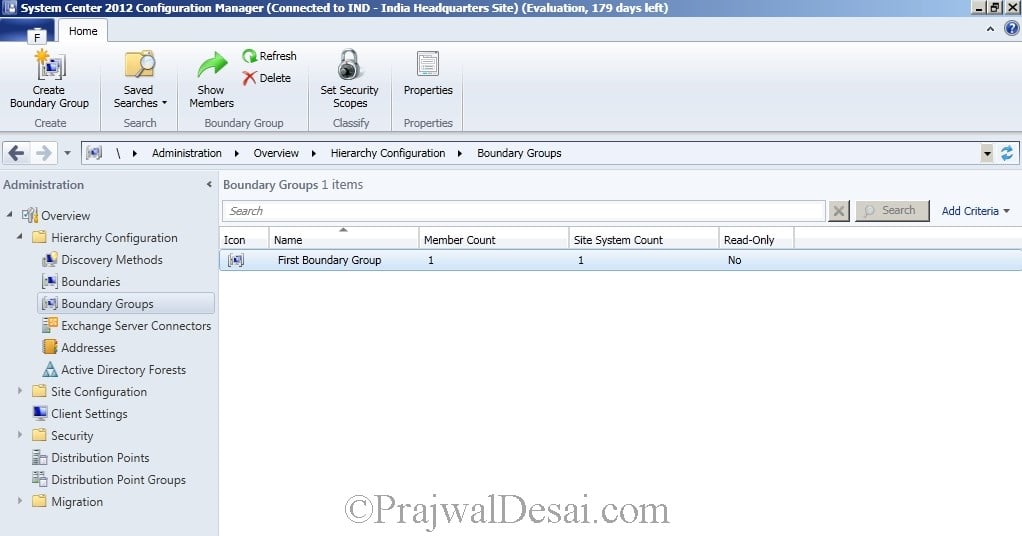
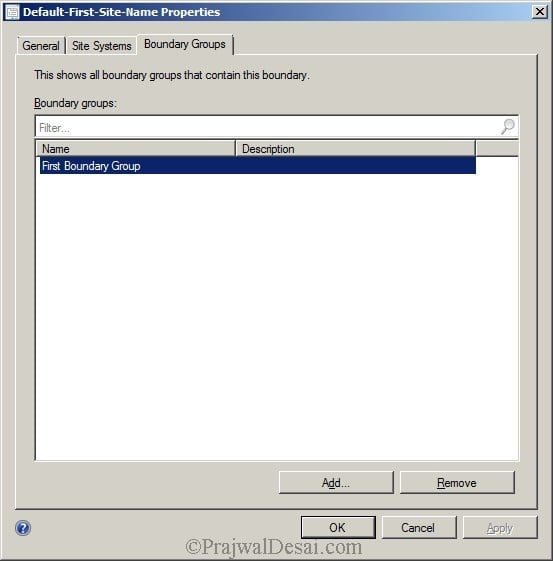
Select Boundaries from the left pane, right click the Default-First-Site-Name, click properties,under Boundary Groups you will find the First Boundary Group Added Automatically.

Thanks for the blog article.Thanks Again. Keep writing.
ReplyDeleteoracle sql plsql online training
go langaunage online training
azure online training
java online training
salesforce online training
hadoop online training
mulesoft online training
linux online training
etl testing online training
web methods online training